Skullcandy Hesh 2 Wireless Headphones

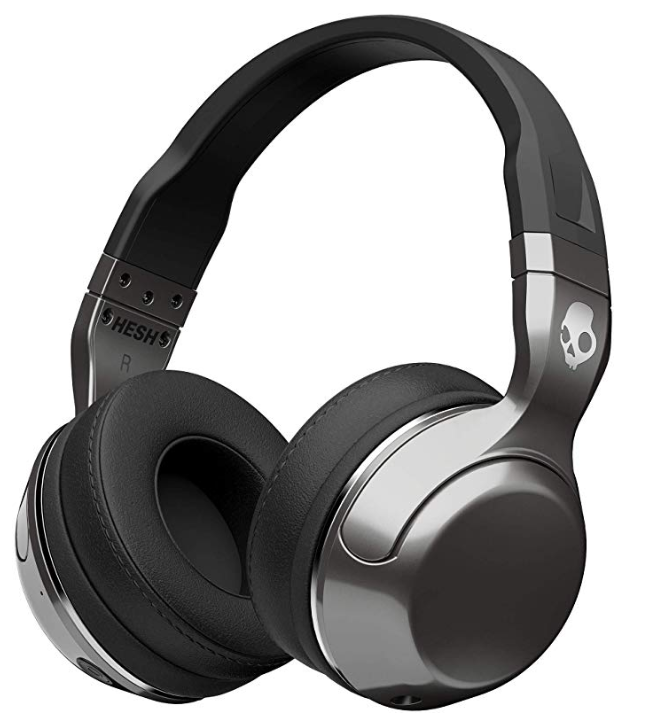
I’m a big fan of these headphones even though they first came out about 5 years ago. A few years ago I was having some issues with my Motorola Buds so I needed to switch to something else temporarily. It turns out we already had the Skullcandy Hesh 2 Wireless headphones in our house. Before I started using this pair of headphones I hadn’t heard much about Skullcandy. Everything that I had heard implied that it was focused on improving it’s cool-factor and not necessarily too focused on producing quality products. That all changed when I put the headphones on and paired them with my phone. It turns out that the audio was actually quite good for me.

I’m not an audiophile by any means but I do tend to be detail oriented when evaluating certain things. One of the things that I tend to notice imperfections in is consumer goods and especially electronics related consumer goods. With that said, I was quite satisfied with the sounds coming from these headphones insofar as I didn’t notice any glaring imperfections. The music that I initially listened to sounded balanced, clear, with no definitive bias toward highs, mids, or lows. As I went through all the different kinds of music I listen to I found little to complain about. Whether I was listening to Jazz, Pop, Electronic, Hip-Hop, Vocal Podcasts, or anything in between, it all sounded pretty good.

Let’s now look at some of the non-audio related features of these headphones.

  • I’ve worn them regularly for as long as 4 hours without breaks and haven’t experienced any noticeable fatigue.
  • The pairing process is fairly standard in that turning them on initially will put them into pairing mode if you haven’t paired them with any device before. Holding the power on button from the off state will put them into pairing mode no matter what (which helps pair to additional devices). Switching between connected devices is fairly easy in that the headphones remember the last few devices paired with so as long as they’re not connected to a specific device one can connect them to any previously paired device at will. This works 99% of the time reliably, which, with Bluetooth implementation variations among vendors is actually pretty good.
  • Longevity seems to be quite good as I’ve used them for at least 10 hours per week for the past 2 years without issue. There is some paint chipping in a few places on the band but overall they look as good as the first days I used them. With how consumer electronics tend to be designed for short lifetimes, this level of longevity has already impressed me.
  • Maximum wireless distance with line of sight seems to be quite good as I tend to walk around our house without losing connectivity. I estimate 30 feet from the audio source is the minimum I get without issue.
  • Battery life has continued to impress me in that I get at least 10-12 hours of battery life even after 2 years of regular usage. I believe the manufacturer estimated battery life on a full charge is 15 hours, so this is still fairly good. Charging the headphones does take 2-3 hours but these use the older micro-USB charger and don’t support any newer fast charging protocol.
  • These headphones have a pretty good microphone and I take calls on them almost every day with no issue. I’ve been told that my voice sounds clear to callers and I can hear their voices with reasonable clarity as well.

Overall I continue to be satisfied and enjoy using these headphones on a near daily basis after 2 years of regular usage. I have purchased newer headphones that support Bluetooth 5.0 and have fast charging and Active Noise Canceling features. None of them have satisfied me enough to make them my daily drivers. I do use other Bluetooth headphones periodically, but I tend to come back to the Skullcandy Hesh 2 Wireless over and over as the best overall paid of Bluetooth headphones I’ve used so far.

If you want to pick up a pair grab them at Amazon (non-affiliate link):
https://www.amazon.com/Skullcandy-Bluetooth-Headphones-Microphone-Rechargeable/dp/B00NCSIN4W/?th=1

European Multi-point Lock Home Automation

So after two years of struggling with a simple European-style multi-point lock in the United States, I can finally breath a sign of relief in that I can remotely control the lock! Well, sort of. The thing that you have to remember is that the kind of multi-point lock that we have requires the handle to be lifted (engage multi-point) before engaging the deadbolt. This makes it basically impossible to remotely lock the deadbolt if someone forgot to raise the handle.

Despite the “raising the handle to lock” caveat, everything else works. I can see when the lock has been unlocked in Home Assistant. I can also unlock the door remotely or via presence automation!

This is a huge deal as now I can notify on state changes and get my Home Assistant or node-red systems take action based on lock state (and maybe battery status, if I spend some more time).

This project all started with trying to find the right way to retrofit a multi-point locking mechanism with something that is at least electronic and preferably Z-Wave controllable. After weeks of research and cost-benefit analysis, I settled on taking the plunge on importing a Z-Wave lock from the UK. I ended up with pretty much the only viable option at a sub $2,000 price, the Yale Conexis L1:

The bad news is that Yale is not necessarily the most adept at making software to manage their decently built locks. So once my UK imported lock arrived in the US, I installed it, and was immediately stuck with being unable to download the Yale Conexis L1 Android app. Naturally, there had to be a geographic restriction on a lock. Why? I have no clue. Doesn’t seem like there’s any “licensing” issues. I’m sure someone will tell me it’s related to encryption export restrictions, but that seems a ridiculous argument for a consumer lock mechanism.

To get around the app issue, I found an APK on the many APK repositories that do not have geographic restrictions. With the help of a geographically diverse VPN I was able to activate the app as if I was in the UK. After that, I linked the app with the lock and was able to unlock it via Bluetooth. This was good but I’m not one to shy away from going further. To be fair, unlocking the door by having to pull out your phone and open an app seems pretty cumbersome when you’re trying to automate your home. So the next step was to be able to control the lock via Z-Wave.

Cue importing a Z-Wave module that is inserted into the top of the lock.

Once you install this module, you realize that it runs on EU Z-Wave frequencies. Cue importing a EU Z-Wave controller from Amazon UK. After waiting for almost 10 days to receive said controller, Amazon lost it at my front door. Marked as delivered, nowhere to be found. The next step in the journey was to order a similar controller (Aeotec Z-Stick S2 UK) from eBay. This arrived in one piece.

The next challenge was how to integrate a second Z-Wave module into an existing Z-Wave network. I ended up installing the controller into the same server as my first Z-Wave controller but spun up a second Docker container for another instance of Home Assistant dedicated to the lock. This worked well and I did a happy dance when I clicked the UNLOCK button in the Home Assistant and it actually worked.

The only thing left was to duplicate state and control over to my primary Home Assistant instance. This wasn’t too hard to do but did require some Home Assistant automations and some MQTT communications channels between the two home assistant instances. After a few hours of tweaking I now have full control of the lock from my primary Home Assistant instance!

What’s the overall message? Where there’s a will, there’s a way! Don’t give up on your home automation journey!

Gutting Amazon Web Services Bills – SQS – Part 1

How do we cut a six-figure Amazon Web Services (AWS) bill?  This has been the question I’ve been wrestling with since 2013.  When I was first asked to tackle this challenge, we were running hundreds of Elastic Cloud Compute (EC2) instances, hundreds of queues in Simple Queueing Service (SQS), dozens of database instances in Relational Database Service (RDS), hundreds of NoSQL tables in DynamoDB, and about another dozen AWS components that we were leveraging regularly.  At one point, we were considered one of the few organizations that was using almost every AWS cloud service in existence.  It makes sense that a hefty price tag was attached to this amount of utilization.

The thing about startups is that rapid progress and time-to-market are at the top of everyone’s priority list.  The challenge is not to let your infrastructure costs become excessive.  In late 2013 we saw that we were letting our costs run rampant on the systems side.  This was when I volunteered to drive the cost optimization project.  I was already well acquainted with most of the AWS services we were leveraging but finding inefficiencies and optimizing was not something I’d done before in this area.  The best way to tackle a new kind of problem is by understanding the current situation.  To that end I started by evaluating our current cost breakdown in a visualization tool called Teevity.

What I learned from Teevity was pretty hard to believe.  Among the many things that seemed too expensive for our organization, the first one that really stuck out to me was queueing.

2014 SQS Cost/Day
2014 SQS – Averaging $280/day

We had over 200 managed queues set up in AWS SQS and were spending on average $280/day just on queueing.  My estimate was that our I/O was approximately 100 million messages daily.  About two-thirds of these queues had low utilization because they were set up for our non-production environments.  The existence of queues with little utilization has almost no associated cost.  An idle SQS queue essentially exists free of charge.  These were not going to help lower costs.

As I brushed up on my SQS documentation and monitored usage patterns in AWS CloudWatch (the de facto monitoring system tied into all AWS services) and the SQS console itself, I realized that we were doing something bad.  We weren’t using batching.  More accurately, we weren’t using batching enough.

You see, we are a Java/PHP house.  Most of our core platform services are pure Java and leverage AWS SDK for Java when talking to any AWS managed service.  We also use a lot of Apache Camel for message routing within and without our applications.  While integrating his application with AWS SQS, one of our architects wrote a multi-threaded version of Camel’s AWS SQS component that allowed us to increase SQS I/O throughput (this is now unnecessary as Camel’s AWS SQS component can now handle concurrent polling threads natively) and leverage receive (consumer) batching.  This helped us move data in and out of SQS much more rapidly as well as save a bit of money.  Unfortunately we were unable to take advantage of all the cost savings available to us until I found that AWS SDK for Java had an AWS SQS buffered client that included implicit producer (send) buffering and auto-batching.

The capability of buffering messages on the SQS client is great because the client is one of the first/last points of contact with the SQS API (first on receive, last on send).  This is advantageous because the client can be responsible for minimizing API I/O (and in turn cost) and at a higher level, the application can be less coupled to how it communicates with it’s various queues.  When we switched to the native buffered AWS SQS client in each application, it immediately produced cost savings.  When an SQS producer would request a message to be sent to a certain queue, the AWS SQS client would hold the message for a few hundred milliseconds (configurable) while waiting for additional requests.  If no additional requests were received, the message was sent as is.  But, if more messages were received within the buffering wait time, a batch was created.  This batch would hold up to 10 messages (configurable) and then be sent to the appropriate SQS queue.  So instead of hitting the SQS API 10 times, we would only hit it once when the batch was optimally filled.  This produced a cost savings of up to 10x (on the sending side) in every application we applied the learning to.

The great thing about the change that made this possible was that the AWS SQS buffered client was a drop-in replacement for the unbuffered client.  With our universal usage of Spring Dependency Injection, using a different AWS SQS client was literally a change that consisted of a few lines of code in our in-house SQS Camel library.  Even without dependency injection, the scope of the drop-in change is minimal as follows:

// Create the basic SQS async client 
AmazonSQSAsync sqsAsync=new AmazonSQSAsyncClient(credentials);

// Create the buffered client
AmazonSQSAsync bufferedSqs = new AmazonSQSBufferedAsyncClient(sqsAsync);

The other change that we applied was to enable Long Polling on most of our queues.  Long Polling allows the SQS client to wait up to 20 seconds when polling for new messages for there to actually be messages in the queue.  For queues with inconsistent usage patterns (that can sit empty for at least a few seconds at a time), this can eliminate a great deal of API hits that return with no results.

After all the above discussed changes were applied, our overall AWS SQS cost dropped by 4x from $280 to $70/day.

2015 SQS Cost/Day
2015 SQS – Averaging $70/day

Overall, we learned that sometimes significant cost savings can be had with simple changes to the way we use infrastructure.  With the modifications discussed above, none of ours platform functionality was sacrificed, but we were able to cut our costs by 4x.  There are more examples of this kind coming up in this series!

In the soon to be released Part 2, I will discuss another simple way to cut AWS costs.

Bad Behavior Is Quite The Stickler for Rules

The anti-spam and anti-malicious bot PHP tool, Bad Behavior has recently caused me quite a headache.

It started as a simple issue.  Our in-house RSS feed polling component could not pull a feed from one specific site, returning a “403 Bad Behavior”.  I’d never seen this specific status string of the 403 response code, and it’s a non-standard status string based on https://en.wikipedia.org/wiki/HTTP_403.

When getting the RSS feed (http://blogs.pb.com/pbsoftware/feed/) from Chrome or Firefox it showed up just fine.  This behavior led me to think this was some kind of a bug in our component based on the format of the source RSS feed.  I tried validating the feed using the tool at http://www.validome.org/rss-atom/validate.  Everything checked out as valid.

With the knowledge that the feed was not the cause of the problem, I decided to try emulating our custom polling agent through cURL and see if I could reproduce the issue we were experiencing:

curl -I -H "User-Agent: Mozilla/5.0 (Windows NT 6.2; Win64; x64) AppleWebKit/537.36 (KHTML, like Gecko) Chrome/32.0.1667.0 Safari/537.36" "http://blogs.pb.com/pbsoftware/feed/"

In the response headers I received:

HTTP/1.1 200 OK
Date: Wed, 25 Feb 2015 20:00:35 GMT
Server: Apache/2.4.7 (Ubuntu)
X-Powered-By: PHP/5.5.9-1ubuntu4.5
Set-Cookie: bb2_screener_=1424894435+54.92.202.5; expires=Thu, 01-Jan-1970 00:00:01 GMT; Max-Age=-1424894434; path=/pbsoftware/
Set-Cookie: wfvt_4241898385=54ee29e3d3b4b; expires=Wed, 25-Feb-2015 20:30:35 GMT; Max-Age=1800; path=/; httponly
X-Pingback: http://blogs.pb.com/pbsoftware/xmlrpc.php
Last-Modified: Tue, 24 Feb 2015 18:41:21 GMT
X-Robots-Tag: noindex,follow
Vary: User-Agent
Content-Type: text/html

I wasn’t getting a 403 response despite the fact that the user agent I specified in my cURL command was actually the same one we used in polling the feed through our component.  Additionally, we sent Accept-Encoding: gzip and Connection: Keep-Alive.  So to get as close as possible to what we were explicitly doing with our custom polling agent, I re-ran the cURL command as:

curl -I -H "Accept-Encoding: gzip" -H "Connection: Keep-Alive" -H "User-Agent: Mozilla/5.0 (Windows NT 6.2; Win64; x64) AppleWebKit/537.36 (KHTML, like Gecko) Chrome/32.0.1667.0 Safari/537.36" "http://blogs.pb.com/pbsoftware/feed/"

Once again, I received a 200 response with no issue.  At this point I was confused and figured that maybe our custom polling agent was being blocked on the server side based on some sort of IP blacklist.  To test this, I re-ran the above cURL command from the machine that was hosting the custom polling agent.  Still, I received a 200 response.  Frustration was setting in and I began to think about the overall HTTP handshake and whether I was missing something.  I decided to go to verbose debugging and began looking at the verbose traffic that cURL was sending.

So, turning on the verbose option (-v) in cURL got me the answer:

curl -v -I -H "Accept-Encoding: gzip" -H "Connection: Keep-Alive" -H "User-Agent: Mozilla/5.0 (Windows NT 6.2; Win64; x64) AppleWebKit/537.36 (KHTML, like Gecko) Chrome/32.0.1667.0 Safari/537.36" "http://blogs.pb.com/pbsoftware/feed/"
* Hostname was NOT found in DNS cache
* Trying 166.78.238.221...
* Connected to blogs.pb.com (166.78.238.221) port 80 (#0)
> HEAD /pbsoftware/feed/ HTTP/1.1
> Host: blogs.pb.com
> Accept: */*
> Accept-Encoding: gzip
> Connection: Keep-Alive
> User-Agent: Mozilla/5.0 (Windows NT 6.2; Win64; x64) AppleWebKit/537.36 (KHTML, like Gecko) Chrome/32.0.1667.0 Safari/537.36

Note the bolded header.  The Accept header was the only difference between what our custom polling agent was sending and what cURL was sending during this test (it did so implicitly).  Not sending an Accept header conforms to RFC2616 (http://www.w3.org/Protocols/rfc2616/rfc2616-sec14.html) and means that we accept all content types.  Apparently something on the source server was checking for this header and blocking traffic that did not explicitly include it.  That something turned out to be the Bad Behavior component.  We’ve never explicitly butted heads with this piece of software so finding out that it was blocking us from polling a site’s RSS feed based on it’s need to see an Accept header was very enlightening.

To solve for the issue we were experiencing with this site, I modified our custom polling agent to send an Accept header as follows: Accept: */*.  With this change, I expect that we will be able to cleanly pick up more RSS feeds as Bad Behavior seems to have some reasonable installed base.  Anything that helps us find more quality expert content is a big win.